Reiger verjagen

Sinds een paar dagen zie ik geen goudvissen meer. M’n drie Koi’s zijn wel te zien. Er zitten ook grote goudvissen in de vijver. We zien een reiger op het dak van de achterburen. Loopt een beetje over de nok. Later zie ik hem in de tuin en vliegt ie weg met een kikker. Daar heb ik genoeg van, maar hij moet niet door krijgen dat er meer is. Wegjagen helpt niet.

We zitten in de tuin en de reiger komt rond 6 uur weer aanvliegen. we worden al paranoide als we een schaduw zien. De reiger komt van de nok naar de dakkapel van de achter buren en gaat op de rand zitten. De volgende stap is afdalen naar het dak van de overkapping van de achterburen. Dan loopt ie langzaam over de schutting. Wij zitten muisstil in de tuin om te kijken wat hij gaat doen. Geen 4 meter afstand en ziet ons dus niet als gevaar.

Even later zitten we binnen en zien we hem wegvliegen met een goudvis. Weggepikt bij het riet. Waarschijnlijk zijn de goudvissen toch aan het paren tussen het riet en dus zichtbaar. Wat te doen? Ik lees dat niets helpt maar visdraden spannen over de tuin het landen kan bemoeilijken. Ik span een paar draden aan de achterkant, zodat er niet makkelijk vanaf de achterschutting in de tuin geland kan worden.

Ik zet ook een 180 graden camera aan ‘s nachts op 5 sec timelapse. Op de beelden zie ik net na zonsopgang (ca. 5.30) de reiger weer komen en weer bij de riet kraag een dikke rode goudvis pakken. Hap slik weg. daarna vliegt hij weer weg. Op deze plek zijn geen visdraden gespanen. Alleen rond de vijver, maar dat helpt dus niets.

Er zit maar 1 ding op: een net spannen over de vijver. Niet zo mooi, maar het kan niet anders. Ook over de hele tuin visdraad met 15 kg trekkracht gespannen om de 60 cm. Weer een timelapse opname gemaakt. Op deze opname zie je, dat de reiger niet meer via het vaste patroon op de schutting gaat zitten. Je ziet hem over de schutting rondlopen en uit eindelijk via een paal toch op de grond weet te komen. Daar loopt ie om de vijver en kan niet bij het water. Vliegt later weer weg. Ik denk wel een uur is hij in de tuin geweest.

Ik ga nog wat spijkers op de paal zetten en maak nog een paar keer een timelapse. Als ik een paar dagen geen reiger bezoek heb ‘s morgens vroeg, dan ga we de goede kant op.

Update 7-6

5 nachten een timelapse gemaakt en geen reiger meer ‘s morgens vroeg. Een enkele keer ‘s avonds nog wel eens gezien op de nok van het dak, maar na een 10 min. weer gevlogen.

First impressions Samsung Gear360, 10 June 2016


Friday 10 June, I received my Samsung Gear 360 camera. Nice small white tennis ball with on both sides a 180 degree lens. The use of this camera is very ease. Place the battery and MiniSD card (minimal type 10), charge to full and use. The menu is simple: click to set photo, movie or setting and time-lapse. gear360
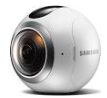
The button on top makes a movie/photo.

Ecosystem

It’s a Samsung! So remote connecting only possible by Samsung Gear App in Android store. My iPhone6 is not compatible with the Gear360. No App in the AppStore to use. I can only load the movies and photos with Cyberlink Gear 360 Action. After the 360 photos and movies are imported in Cyberlink, the stitching is started. After a while the jpg and mp4 are place in a folder 360 on your output folder. (settings can be chosen).

How to view the 360 degree content?

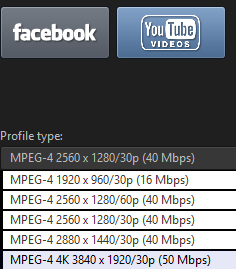
With the Cyberlink editor you can see the 360 photos and movies and move with mouse action. But how can I see the photos on my iPhone? In Cyberlink you can publish the movie to facebook ore youtube. In Youtube the movie is 360. Open in your phone, the movie is playing and swiping is working. Even my VR-Pro headset is usable.

So the easy to use environment with Samsung S6/7, Gear remote viewer and control, stitching on S7 and play (or in the Gear headset), is not available for Apple. When is the Gear remote in the Apple Store? I’ve contact Samsung_NL by Twitter, but there is no news about an iOS App. Waiting for an answer from Twitter group Samsung_Developers.

Create a video with only photos (set duration to 15 sec. to view around) is an other way to see your photos on YouTube. I prefer to use a hidden link in Youtube. (disable the notifications to your subscribers in advanced tab.)

I used Microsoft OneDrive to upload my files to my iPhone but could not find a good 360 photo viewer. I can only see the photos stretched. How to distribute the files and let them show to my family?

Later I found a good working App : PhotoSphere (0,99) and Mobile VR Station for all kind of 360 files. You must import the photos first from the camera roll. It’s not possible to add the photos directly from OneDrive. So download and save them first to the camera roll. Zooming and swiping is possible.

So my 360 journey starts today and takes some challenges.

Some ideas how to film in 360 degrees

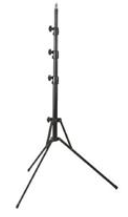
There is no director needed for this camera. Just think the viewer is the camera. The audience is the director self. I think it’s a good rule to place the camera on eye height (sitting about 105 and standing about 155 cm). I bought a simple photo Light Stand ( $ 26). This has a stable base and is easy adjustable.

Light Stand

Place the set on the right location and (with Samsung App on S7) start the movie. Because of 360 video, you are always in the picture if you start capturing by hand. Some cutting is needed.

I Think 360 movies are great to record a theater show as sitting in the front row or maybe better on row 6. The camera can also use only the front 180 camera (in the back are only spectators so mostly you need only the front to see the stage). Good for shows of your kids at school. In the professional scene JauntVR  did some good thinks. See there App.

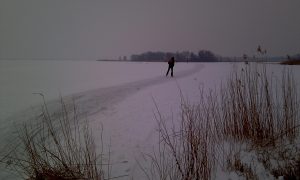
I tested the camera on a fancy fair. Walking with the Gear360 in front of me. If you look back you see me.  This is more or less a video 360 blog. Go to.

I can imagine that you don’t want to see yourself in the video shot.
I also did some recordings on a Wedding. Put the Gear360 on a Light Stand and record about 4-6 min. per shot. Stitching in Cyberlink is a time-consuming operation. The process is processor and memory intensive. The whole wedding movie takes a day. After the stitching, you need to create the video and after that the upload takes another few hours. How more detail (4K) the more time you need for both creating and uploading. I used a MPEG-4 4K 3840×1920/30p (50 Mbps) format in mp4 for YouTube.


Youtubu upload


Make 360 degree photos

When you make photos, the best way is to put the camera on a simple Light Stand. Make a photo with timer and only the feet of the Stand is visible. The default timer is 3 sec. Set it on 10 sec. to hide yourself. (With the Samsung remote App, it’s easier to make a remote photo.
Second way to hide yourself: hold the camera on your head. You are almost gone!

End conclusion.

360 video is a great way to jump into the next experience of movies. The way to deliver is not for all people easy. iPhone users’ needs more steps to deliver the experience of VR.
Is it cheap to start 360 video? No, but to reach the consumer market it’s a good start.

Update July 5

I have no Samsung S7 smartphone, but iPhone6S, so no remote control.

I’ve made a wedding movie. Total length is about 90 minutes. I run the Cyberlink gear Action software on a PC with AMD Athlon64 x2 Dual 6000+ with 3 GHz and 8 GB memory. It took about 3,5 day to stitch the files from the gear360. Full processor load!  After that I create the movie and remove first and last 30 sec (start/stop recording by button on camera) from every shot. Creating the movie cost another night. Then upload to YouTube to watch. You need a fast multi core processor and some patient. Results are amazing!

Update November 14

I had some big problems with copying files from Gear360 to computer: some files could not stitched in Cyberlink PowerDirector15. Files are corrupt. Weird is that these files are random in the list. Even after a format of the SD card, the problem exist. Now I found out, that direct copying the files from SD to Computer (my laptop has a SD slot), the bad files much bigger are then the files already copied by camera connection. Now I could restore some corrupted files from earlier 360 movies.

So this is a better way to import files from camera to computer.

Boekhouders zijn conservatief

In de afgelopen weken ben ik flink in de weer geweest met het koppelen van mijn audio en video. Ik wil namelijk graag af van die berg afstandsbedieningen voor, onder andere, mijn televisie, Blu-ray en Chromecast.

Sonos heeft het probleem van al die verschillende afstandsbedieningen in één klap opgelost door een smartphone of tablet als bediening geschikt te maken. Mooi, maar die oplossing is alleen bedoeld voor muziek. Als je ook nog een beeldfanaat bent, zoals ik, dan sta je voor nog veel meer uitdagingen.

Onder de motorkap

In de loop der tijd heb ik allerlei hoogwaardige en ‘zware’ apparaten in huis gehaald. Toen mijn dochter twee jaar geleden afstudeerde bijvoorbeeld, vond ik het tijd voor een 3D-camera. Zo’n unieke gebeurtenis wilde ik zo ‘echt’ mogelijk vastleggen. Later was mijn televisie aan vervanging toe (ik had nog een echte ouderwetse 32” LCD-tv) en dat moest natuurlijk een 3D-versie in HD worden. En welja, doe er ook maar Smart bij. Hoewel die Smart-functie inmiddels tenenkrommend is, compleet met vastlopers en reboots, is het beeld prachtig. Daarom besloot ik Smart te vervangen door Chromecast (eerst versie 1, nu door de verbeterde versie 2). Het resultaat? YouTube, Netflix en Spotify doen het weer vloeiend. Maar wat blijkt? De meeste televisies laten alleen maar stereo door via de extra HDMI-aansluitingen. Dit betekent dat het geluid van een film niet in 5.1 aankomt op de AV Receiver (soms moet je ook nog een audioverschuiving instellen op de televisie voor lipsync!). Om dit te verhelpen, heb ik de Mediaplayer en Blu-ray rechtstreeks aan de AV Receiver gekoppeld, met SPDIF voor alle 5.1-kanalen.

De berg bedwongen

De huidige stand van techniek is: 3D, 4K, DTS (-X), Dolby Digital (nu ook al Atmos), beeld en geluid via HDMI 1.4 en geluid via SPDIF en COAXial. Inmiddels heb ik de puzzel bijna rond ‒ alles in volgorde van kwaliteit. Het beeld van Mediaplayer MiniX, Blu-ray en Chromecast loopt via HDMI op 4K- en 3D-niveau naar televisie en beamer. Al het geluid gaat via optische kabel of Coaxial op SPDIF naar de AV Receiver. En de meeste schakelacties lopen via een programmeerbare Philips-afstandsbediening op infrarood. Dat werkt als volgt: een infraroodontvanger/-zender stuurt de acties door naar de apparatuur. Door het kiezen van een activiteit op deze afstandsbediening worden alle bijbehorende apparaten aangezet en de doorschakelingen gemaakt op de juiste ingangen. Het goede nieuws is dat ik nog maar twee afstandsbedieningen nodig heb! Het slechte nieuws is dat Philips pas bedacht dat de tv maar met een radiosignaal moet werken. Oftewel, als bij de volgende afstandsbedieningstechniek infrarood in de ban wordt gedaan, heb ik weer een probleem.

Keep it simple

Maar waar blijft nou eigenlijk de boekhouder in dit verhaal? Tijdens mijn speurtocht dacht ik er helemaal niet over na om mijn super NAD AV Receiver te vervangen. Het werkte toch goed? Maar toen zag ik in de winkel een hedendaagse AV Receiver. En guess what? Het apparaat was uitgerust met alle aansluitingen: 8x HDMI in, 2x HDMI uit, geluid via optisch én coax, Wi-Fi, netwerk, Netflix, bluetooth, geluid op DTS-X, Dolby Atmos én een afstandsbediening die ook nog eens via een app kan worden bediend. De prijs? De helft van wat ik tien jaar geleden voor mijn AV Receiver betaalde. Hoe simpel kan het zijn?

Afscheid

Kortom, door vast te houden aan mijn oude spullen had ik een hoop geld en tijd gestoken in het koppelen van mijn systemen. Terwijl ik eigenlijk de sprong naar de volgende generatie audio had moeten maken. De technische ontwikkelingen gaan nu eenmaal zo snel, dat je soms afscheid moet nemen van je oude apparatuur, ook al zegt de boekhouder in jou: niet doen, het werkt nog prima.

Gemak

In mijn werk als virtualisatieconsultant kom ik dezelfde situatie tegen. Zo worden servers, die worden vervangen door nieuwe gevirtualiseerde systemen, vaak niet meteen afgeschreven en boekhoudkundig ten laste gelegd van het virtualisatieproject. Natuurlijk zit niemand te wachten op kapitaalvernietiging, maar als je er een simpel en intuïtief systeem voor terugkrijgt, is dat niet altijd eenvoudig in geld uit te drukken. Maar het levert wel een hoop efficiency en gemak op!

Ben ik nu helemaal klaar en tevreden met mijn thuisbioscoop? Niet bepaald. Sterker: ik ben nog maar net begonnen! Er zijn namelijk nog allerlei upgrades mogelijk naar, bijvoorbeeld, 4K TV, full HD 3D-beamer (later vast ook in 4K), nieuwe AV Receiver, subwoofer en extra speakers. Nee, het houdt nooit op. En als het om vernieuwing gaat, is dat maar goed ook!

Voor de geïnteresseerden een overzicht van mijn apparatuur:

  • Philips TV 3D (passief) 1080p
  • Optoma-beamer 720p 3D (actief)
  • LG 3D Blu-ray BD850
  • Chomecast 2
  • MiniX NEO X8- H Plus
  • NAD T741 Receiver
  • Optische 2 SPDIF to 1 switch (allekabels.nl)
  • 4 HDMI to 2 HDMI matrix switch (allekabels.nl)
  • Philips universele infrarood afstandsbediening


Dit is wat u de hele tijd heeft gemist.

Applicaties met een vingerknip bij de gebruikers? In navolging van mijn vorig blog over VDI: Perfect aansluitend op een virtuele desktop omgeving.

De grootste vraag van gebruikers is een applicatie te mogen gebruiken. We zijn al zo gewent geraakt aan een geAppte applicatie, die eenvoudig zelf snel te installeren is, dat we dit ook van onze werkomgeving verwachten. Zelf zoeken in een catalogus met bedrijfs applicaties en deze toevoegen? Nog lang niet alle bedrijven zijn zover. Nee, we bellen met de helpdesk en vragen om een applicatie. Als die er niet is, dan gaat een waar proces in werking. Er moet een applicatie worden aangeschaft, gescript voor uitrol en getest. Dan moet deze nieuwe applicatie in een distributie omgeving worden gezet en de gebruiker moet er rechten voor krijgen.

Een applicatie eigenaar weet vaak het best, hoe de applicatie moet worden getuned. Zou het niet mooi zijn als deze de applicatie zelf kan installeren en inrichten alsof het op een eigen werkstation wordt gedaan. Met het nieuwe techniek van het net aangekochte bedrijf CloudVolumes door VMware kan dit. VMware AppVolumes maakt gebruik van de beste mogelijkheden van virtualisatie. Aan een virtuele desktop wordt een extra virtuele disk (heet een Volume of AppStack) gekoppeld en daarin worden de applicaties geïnstalleerd. Voor elke groep aan applicaties kan een apart Volume worden aangemaakt. Meerder volumes kunnen aan een desktop worden gekoppeld. Heeft de gebruiker rechten op het Volume, dan is de applicatie direct beschikbaar, alsof deze lokaal is geïnstalleerd. De actie kan zelfs realtime!

Het zou zo kunnen klinken. Klant: “Ik heb een nieuwe stoel nodig” . Helpdesk: “Gaat u even staan, klik, OK gaat u maar weer zitten” . Gebruiker: “Ongelooflijk, ik heb een nieuwe stoel”.  Dit zou dus ook met een applicatie kunnen. Iets netter is natuurlijk als de gebruiker even afmeldt en weer opnieuw aanmeldt.

En als er dan een update moet komen in een applicatie, zult u denken? De bestaande Volume wordt gecloned, en de applicatie wordt geupdate en na de test wordt dit nieuwe Volume aan de groep gebruikers gekoppeld. Wanneer deze opnieuw aanloggen is de applicatie vernieuwt.

Maar ik heb een eigen dedicated virtuele desktop!

Ook aan mensen met een eigen desktop en lokale installatie rechten is gedacht. Deze gebruikers krijgen een eigen Writable Volume. Wanneer deze gebruiker naast de standaard appliacties een eigen applicatie wil installeren, komt deze op het eigen Writable Volume te staan. De desktop blijft eruit zien als een echte eigen desktop. Alleen de C schijf is te zien.

De desktop wordt een lege machine met een OS (Operating System) en een paar agents.

In de toekomst zou dit ook voor een fysieke desktop kunnen. Een VHD disk zou dan naar een fysieke desktop of laptop gekopieerd kunnen worden met daarin de applicaties. De AppVolumes Agent zal deze zien en koppelen aan het OS. In dit geval zal het natuurlijk veel langer duren voordat de applicatie beschikbaar is. En VHD van 20-30 Gb kopiëren duurt even.

Ikzelf ga uiteraard voor een VDI omgeving, waar de eigen laptop alleen als een toegangs device fungeert.

Hoeveel van deze containers met applicaties heb je gemiddeld nodig?

In de praktijk van het gebruik van AppVolumes zijn meestal niet meer dan 7 Volumes nodig. Vaak is er een voor de basis applicaties en dan nog een aantal met specifieke bedrijfstoepassingen voor verschillende afdelingen. Bijvoorbeeld voor Engineering, Sales en Administratie.

De eenvoud van deze toepassing, zal oude methoden gaan vervangen. Ik ben er van overtuigd, dat de gebruiker gaat bepalen wat hij wil gebruiken voor z’n werk. Het applicatie deliver en update proces zal een stuk eenvoudiger worden en daardoor sneller en goedkoper voor de organisatie.

Op dit moment heb ik een demo omgeving draaien met daarin een Volume met de hele AutoDesk Design en Infrastructure Suite Ultimate er in. Meer dan 40 Gb aan 3D grafische applicaties, zoals AutoCAD en Revit. Deze applicaties zijn net zo makkelijk te koppelen aan een gebruiker als een willekeurige andere applicatie stack. De standaard 20 Gb Volume moet wel worden vergroot. Ik heb hiervoor een filmpje gemaakt hoe dit te doen. De hele installatie van de software duurt enkele uren! (ook een msi package!) App Volume toekennen aan de gebruiker: in enkele seconden beschikbaar. Link naar Demo: http://youtu.be/2GAfd81Dsyk

Zie ook :http://youtu.be/XN649HpO1e0

Het beste is als alle applicaties die bij elkaar horen in dezelfde AppStack staan. Hier worden de voordelen van een All Flash storage met deduplicatie goed zichtbaar. Het kopiëren van de virtuele disk met applicaties bij een update is in seconden gebeurd en de ruimte die het inneemt op de storage is minimaal.

Wat is de winst voor uw organisatie?

Er is maar een image met de software te beheren, de applicaties zijn niet meer afhankelijk van het werkstation en grote groepen gebruikers zijn direct aan de applicatie te koppelen. Applicaties zijn sneller en met minder resources te deployen. Dit zal leiden tot lagere beheerkosten. De techniek is ook op servers van toepassing.

Toekomstige ontwikkelingen, zoals het in realtime klonen van een draaiende virtuele desktop tijdens het aanloggen van de (nieuwe) gebruiker, maken optimaal gebruik van deze techniek.

Heeft u een VDI omgeving draaien? AppVolumes is als demo te installeren. De enige beperking is dat er 10 gebruikers mogelijk zijn, die maar één applicatie Volume toegewezen kunnen krijgen en is tot eind 2015 te gebruiken. (link http://www.vmware.com/nl/products/appvolumes) Bestaande Horizon View Enterprise klanten kunnen AppVolumes per named user gebruiken. AppVolumes zal als standalone beschikbaar zijn en zal worden toegevoegd aan de bestaande Horizon View Enterprise licentie.


VMworld 2014 Europe Barcelona

Last week was VMworld Europe 2014 in Barcelona. Tons of new ideas and changing the way to a software defined datacenter. Big was the EVO rail booth. Now also HP has an appliance. There was a EVO rail install competition: two EVO rail systems and who is running the first virtual machine on it. 15.13 min. was the day winner.

Lot of vCloud Air business. The new name of vCloud Hybrid Services. VMware has announced the new German datacenter. Now in Europe there is a vCloud Air datacenter in the UK and in January in German. The integration of a vCloud Air datacenter in your own private VMware datacenter is easy. Connecting by VPN or direct line, the extended datacenter is like one datacenter. Disaster recovery as a service could be a first step to extend your datacenter and availability.

DSC_1838
vCloud Air connection

There was a lot of renaming: vCloud Suite is now vRealize Suite. Put vRealize at front of the old names and your updated.

vCloud Automation Center is now vRealize Automation. All new tools are based on this suite. The automation of IT is build on vRealized Suite. Self-service portals for end-users.

VMware is eating there own dogfood: 17.000 users are now migrated to VMware Horizon Workspace. VDI, Apps and mobile central managed by AirWatch and VDI.

Eating own dogfood
Eating own dogfood

Click here to Watch general sessions


What about VDI and PureStorage in real live

Running a VDI desktop with an impressive high end software to run in an engineering environment isn’t easy. Some of the Autodesk application doesn’t run in a virtual environment at all. Some Heavy 3D tools need a dedicated graphical interface. First goal is to run the standard application in a shared GPU VDI environment. One image to deploy multiple desktops for 80% off the engineers.

3D design application need lots off CPU power, graphical power and memory. Beneath 3D applications there are always standard office applications running. In a virtual desktop are multiple treads running at the same time. Rule of thumb in a VDI environment is to run 5-6 vCPU’s per physical core on the host server. A nice equipped server  with two sockets and Quad core or hex core CPU with hyper threading delivers 16 or 24 cores. This means about 75-125 single vCPU desktops. (memory 256 Gb)

A CAD desktop (windows7 64 bit) is designed in a minimum configuration with 2 vCPU, 8 Gb memory. Better is 4 vCPU and 12 Gb memory. Now  the ESX host can host 20-30 CAD workstations. In a real world I think the balance in Office desktops and CAD workstations is 3:1 on a ESX host. If we aspect 40 iops per desktop, we need minimum of 1200 iops per host. In Office configurations 2400 iops. This is higher than modern SSD (Solid State Disk) can deliver. Most SSD deliver 500 iops W/R. An local PCI SSD storage card such as FusionIO can deliver more than 350.000 iops.  PureStorage (shared) 400.000 iops

In a virtualized environment I believe that a less complex hardware platform is the key. In the early days off virtualization a shared storage was a must to use the magnificent features of VMware. The less is more concept off virtualization was the key of success. Later on there came more and more best practices and cave cats. Iops, aligning, how many VM’s on a LUN, SSD or caching, multi tiering, FC or iSCSI or local storage. Moving bottlenecks from disk and storage to network connectivity and backwards.

With introducing PureStorage All Flash shared storage, I kill the problems with speed, latency, alignment, thin or lazy zeroed, price of storage per VM and local storage.

At the high-end CAD virtual desktop I want to kill my last bottleneck: the graphical card. VDI must be seamless integrated with my backend virtual infrastructure. Back to the early simplicity in design. If I can deliver 80% of high performance desktops in a shared environment, with the ease of the design concepts of the beginning of virtualization I met the goal of Less is more. Drill down complexity, power consumption, manageability of the complete IT infrastructure.

This is really the automation of IT. No single point off failures, no exception in design, just a self healing platform.


The AnteaGroup (number 33 in the ENR top 200 environmental firms 2012) is running such a virtual infrastructure. In the last 3 months the AnteaCloud has running CAD desktops to run real live design projects, engineers can connect from any device and place a CAD workstation with AutoDesk AutoCAD 2014 and Revit 2014.

Only desktops with extra graphical power are glued to a dedicated ESX host. These desktops are direct connected to a physical graphical card. Known as vDGA (virtual Dedicated Graphical Adaptor ) But running on shared storage we can start these desktops on a new ESX host. Load balancing features in VMware vSphere can’t be used for these desktops, so keep the pool as small as possible.

The power off VMware vSphere, PureStorage All Flash storage, Teradici APEX2800, nVIDIA GRID GPU, 10 Gb Ethernet together with the concept of keep it simple, creates a astonishing flexible virtual infrastructure with real PC experience for the users.

PureStorage

If you want to use shared storage only and then all flash, PureStorage is what you want. Ease of use en flabbergasted speed. Not only more VM’s on a host, but also much higher performance for the costs of spinning disks.

Gartner say’s: Cool vendor 

In 2 hour your in. Video from Virtualization Field days 2012. Some known forum members are on the table like Mike Laverick

Monday, the good, the bad

Monday starts with the knowledge of plugin the new colored patchcables. Now you can see that the connections on a VI3 environment are important. The most machines are running well as a virtual machine.

One problem with the HA agents on esx002 is still there. All checks did not find where the problem is located. FQDN checked, hostsfiles, gateways, all OK (after changed the DNS record from exs002 in esx002 ) I decided to reinstall the server 2. Only 20 min need to a fresh server.

After the reinstall there was a strange problem: VM’s are running, but editing the virtual machine doesn’t work. Believe me: you can destroy easily a SAN VMFS by reinstalling the server with connected FC. Your local disc is the last found. Amazing that the VM’s still running and reachable by RDP. I have contacted Jan Willem Lammers from VMware. Ok, do nothing, VM’s are running because the files are locked. Only possible to P2V again a live running machine ore copy data out. Reboot will destroy the VM. We decided to roll back the old production machines. They are still there. No snapshot-software off the SAN is in use, so no recovering from snapshot is possible. Our P2V technique is improved. We wil again P2V the NT4 servers and Windows2000.  Only the few Windows 2003 servers are saved from the LUN. (SQL server and Virtual Center server and w2k3 templates.)

6 new servers can be fast deployed from templates on the new installed VI3. Today the VI3 system is running fine including the HA. Also the extra dual port NICS are installed. The network is now redundant. We P2V the NT4 servers by coldboot with BartPE CD with Ghost. Move the Ghost image to a share on a Vitual server. Startup a Ghost VM with the same CD (ISO) and restore the image. Change the CD to the Coldboot CD from the VMwareconverter. Start the Ghost VM and P2V this server to the final VM. All is running on a fast server in the same ESX server. Actions are very fast: ca. 2 x 5 min for 6 Gb. After testing the server is migrated. Some servers could not P2V directly with Coldboot CD, because some servers run on a PC with 128 Mb memory. Minimum need is 280 Mb. In the Ghost VM you can install enough memory. This helper VM can be used for every image.


With new lessons learned, a new VI3 is reinstalled in 3 days. Nice training for the local IT staff (and me also). Do and don’ts.